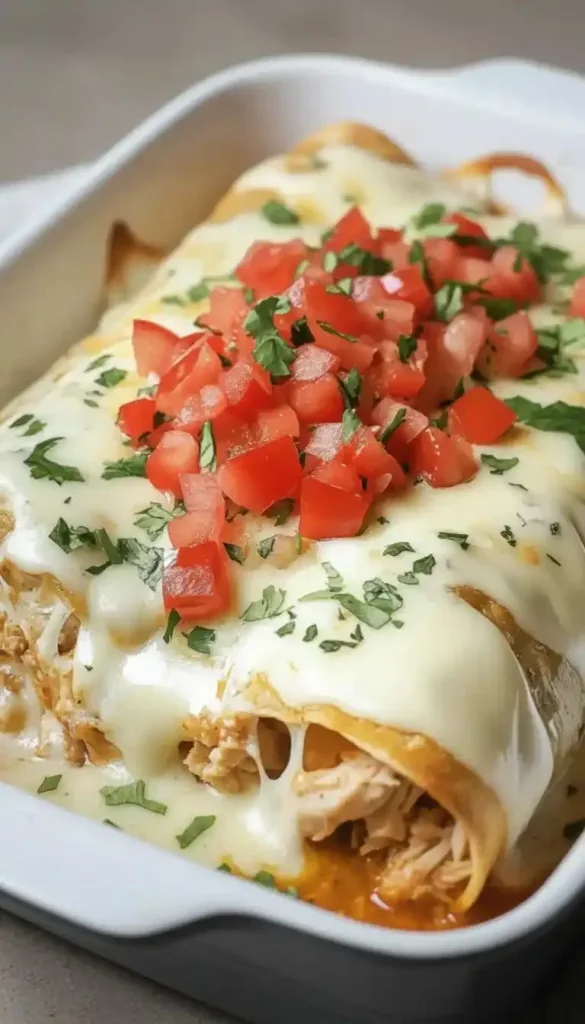
Creamy Queso Chicken Enchiladas
Creamy Queso Chicken Enchiladas for Effortless Family Dinners
Creamy Queso Chicken Enchiladas are a delightful dish that brings comfort and joy to any family dinner. This recipe combines shredded chicken with creamy queso, wrapped in tortillas, and topped with a cheesy sauce. It’s an effortless way to create a satisfying meal that will please everyone at the table.
Table of Contents
Why You’ll Love This Creamy Queso Chicken Enchiladas
- Quick and Easy: This recipe is perfect for busy nights. With simple ingredients and straightforward steps, you can have a delicious dinner ready in no time.
- Family-Friendly: Children and adults alike will love the creamy texture and cheesy flavor that these enchiladas offer. They are a great option for picky eaters.
- Versatile: You can easily customize the ingredients to suit your family’s taste. Substitute proteins or adjust the spice level to make them your own.

How to Make Creamy Queso Chicken Enchiladas
Ingredients:
- 2 cups Shredded Chicken (Substitute with shredded beef or turkey if desired.)
- 1 packet Taco Seasoning (Store-bought or homemade for convenience.)
- 1 cup Sour Cream (Greek yogurt can be used as a healthier substitute.)
- 1 cup Shredded Cheddar Cheese (Monterey Jack or Pepper Jack for a spicy twist.)
- 1 can Chopped Green Chilies (Diced jalapeños can be used for more heat.)
- 1 package Velveeta Cheese (Cream cheese can be used, though the flavor may differ.)
- 1 can Diced Tomatoes with Green Chilies (Fresh tomatoes or tomato sauce can work as alternatives.)
- 8 Tortillas (Gluten-free tortillas available for gluten avoidance.)
Step-by-Step Instructions:
Preparation
- Preheat your oven to 350°F (175°C).
- In a mixing bowl, combine shredded chicken, taco seasoning, sour cream, half of the shredded cheese, chopped green chilies, and one cup of diced tomatoes (reserve the second cup for topping).
- Stir until fully combined.
Assembly
- Take a tortilla and add a generous scoop of the chicken mixture in the center.
- Roll the tortilla and place it seam-side down in a greased baking dish.
- Repeat this process until all tortillas are filled and placed in the dish.
Topping
- In a saucepan, melt Velveeta cheese over low heat, stirring until smooth.
- Add the remaining diced tomatoes and stir until combined.
- Pour this cheesy sauce over the tortillas in the baking dish, ensuring they are well-covered.
- Sprinkle the remaining shredded cheese over the top.
Baking
- Cover the baking dish with aluminum foil and bake for 20 minutes.
- Remove the foil and bake for an additional 10 minutes, or until the cheese is bubbly and slightly golden.
How to Serve Creamy Queso Chicken Enchiladas
Serve the enchiladas hot, garnished with chopped cilantro or green onions. Pair them with a simple green salad, Mexican rice, or refried beans for a complete meal. You can also provide sour cream and salsa on the side for added flavor.
How to Store Creamy Queso Chicken Enchiladas
If you have leftovers, store them in an airtight container in the refrigerator for up to three days. To reheat, place the enchiladas in a baking dish, cover with foil, and heat in the oven at 350°F (175°C) until warmed through.
Tips to Make Creamy Queso Chicken Enchiladas Perfect
- Use Rotisserie Chicken: For even less prep time, use rotisserie chicken instead of cooking your own.
- Control the Heat: Adjust the level of spiciness by choosing milder or hotter green chilies based on your family’s preferences.
- Make Ahead: You can assemble the enchiladas ahead of time and store them in the refrigerator until you’re ready to bake.
Flavor Variations
- Vegetarian Option: Substitute chicken with black beans or sautéed vegetables like bell peppers and zucchini.
- Spicy Kick: Add more diced jalapeños or a splash of hot sauce to the filling for an exciting flavor boost.
- Different Cheeses: Experiment with different cheese combinations, such as gouda or queso blanco, to enhance the richness of the dish.
Pro Tips for Success
- Make sure to cover the enchiladas properly while baking. This helps keep them moist and prevents drying out during cooking.
- Don’t rush the cheese melting process; low and slow heat is key to achieving a smooth and creamy sauce.
- Allow the dish to rest for a few minutes after baking. It helps set the filling and makes serving easier.
FAQs
Can I freeze Creamy Queso Chicken Enchiladas?
Yes, you can freeze these enchiladas before baking. Wrap each enchilada in plastic wrap and place them in a freezer bag. When ready to cook, bake from frozen, adding extra bake time as needed.
Can I substitute the Velveeta cheese?
If you prefer a different flavor profile, you can substitute Velveeta with cream cheese or a mix of shredded cheeses. Keep in mind that this may change the creaminess of the sauce.
What sides go well with Creamy Queso Chicken Enchiladas?
These enchiladas pair well with a variety of sides, such as Mexican rice, guacamole, or a fresh corn salad, making for a complete and delicious family meal.
Final Thoughts
Creamy Queso Chicken Enchiladas are a fantastic option for anyone looking to create a delicious and effortless family dinner. With its creamy, cheesy filling and simple preparation, this dish is sure to become a family favorite. Customize the recipe to fit your family’s preferences, and enjoy a hearty meal together. Happy cooking!
Creamy Queso Chicken Enchiladas
Ingredients
Method
- Preheat your oven to 350°F (175°C).
- In a mixing bowl, combine shredded chicken, taco seasoning, sour cream, half of the shredded cheese, chopped green chilies, and one cup of diced tomatoes (reserve the second cup for topping).
- Stir until fully combined.
- Take a tortilla and add a generous scoop of the chicken mixture in the center.
- Roll the tortilla and place it seam-side down in a greased baking dish.
- Repeat this process until all tortillas are filled and placed in the dish.
- In a saucepan, melt Velveeta cheese over low heat, stirring until smooth.
- Add the remaining diced tomatoes and stir until combined.
- Pour this cheesy sauce over the tortillas in the baking dish, ensuring they are well-covered.
- Sprinkle the remaining shredded cheese over the top.
- Cover the baking dish with aluminum foil and bake for 20 minutes.
- Remove the foil and bake for an additional 10 minutes, or until the cheese is bubbly and slightly golden.